Write Once, Run Everywhere (Part 2 of N)
Desktop apps have the helpful ContextMenu feature but most web apps don't. Also, have you ever tried to interact with the Clipboard from a Web app?

You can read the first article in this series here .
Background
As we continue our journey through this series we need to keep in mind the main goal I am driving toward:
Create An Easy Way For Web Devs To Save User Data
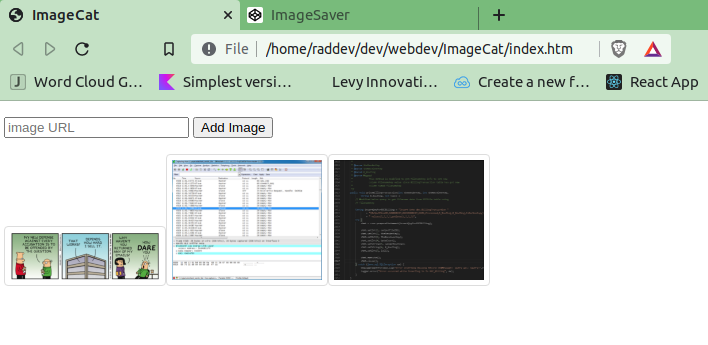
To get to that goal, I'm attempting to create a simple yet useful SPA (Single Page App) which allows us to save a list of images (a catalog of images) and displays them as thumbnails. So far, it looks like this:
In An Effort To Make It Like A Real App
I decided that the next thing we needed in this little app was a way to delete entries.
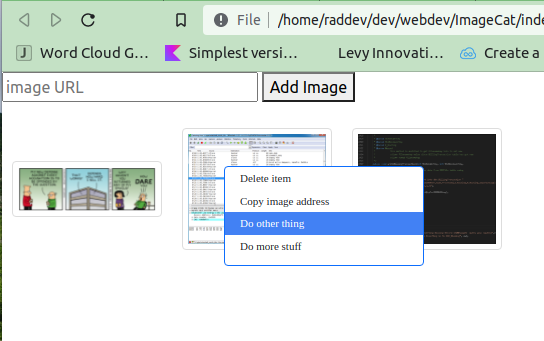
That opens a huge can of worms related to UI / UX. I've decided to create a User eXperience that feels like a desktop app so I've added a context menu when an item is right-clicked (see next image). However, this does not translate to Mobile apps so in the future I have to provide a way to do this for mobile.
Add A Context Menu
Here's what it will look like:
Two Main Ideas
The two things I'd like to talk about in this article are:
- How I built the ContextMenu & how it works
- Copying to clipboard via a web app -- it's so tricky for no good reason
Get The Code
You can get all of the source code for this article at my GitHub repo .
After you clone the repo, make sure you checkout the updateUI branch (otherwise you'll only see the firs t version of the code).
$ git checkout updateUI
#Try It Right Now In Your Browser If you'd like to try the updated code in your browser, just go to my codepen here .
Add Images
Start adding some images and then you can try the context menu. If you want images to try, just do a image search on DuckDuckGo.com (or if you insist, Google) and then right click any image and get the URL. Paste that URL into the app and you'll see the thumbnail appear.
ContextMenu In Web App
A Context Menu that displays upon the user right-clicking an element in your User Interface is a basic human right. It's the way we have interacted with Desktop apps for years and it is very intuitive. Of course, mobile apps don't require a pointing device and really only accept touch commands which are equivalent only to a left mouse button click. Mobile apps have no concept of the right-click and so do not offer a context menu. It is unfortunate.
Build Your Own ContextMenu
This also means that in order to provide the simple & intuitive functionality of a ContextMenu you will have to build it yourself. To do this you must understand CSS styles & Browser events.
Bootstrap Styles
In order to help me do the graphic design of the ContextMenu I've employed the latest version of Bootstrap CSS Library .
That provides me some nice styles that make my context menu mimic context menu styles from Windows.
However, it does not provide me with any functionality for the context menu. For that, we'll need our old friend JavaScript.
Here's what it the HTML looks like:
Basic HTML For ContextMenu
<div class="RADcontextMenu card border border-primary">
 <div class="card-body">
 <ul>
  <li onclick="onContextMenuClick(this)"
       id="delete_item" class="contextMenuItem">Delete item</li>
  <li onclick="onContextMenuClick(this)"
       id="copy_address" class="contextMenuItem">Copy image address</li>
  <li onclick="onContextMenuClick(this)"
       id="other_thing" class="contextMenuItem">Do other thing</li>
  <li onclick="onContextMenuClick(this)"
       id="more_stuff" class="contextMenuItem">Do more stuff</li>
 </ul>
 </div>
 </div>
It's just a normal div tag and an unordered list of items. Each item in the list is a menu item that appears and is clickable. Each menu item will fire the same JavaScript method (onContextMenuClick()) which passes in the HTML element which was clicked.
From that element we will get the associated ID value so we can easily determine which context menu logic should fire.
HTML Class Names
Many of those class names (which are used to apply CSS styles) come from Bootstrap.
- card, 2. border, 3. border-primary and 4. card-body all come from the Bootstrap styles.
The one style I've created is the main RADcontextMenu style.
Here are all the styles in the main.css.
CSS Styles Used to Create User Interface
When the user hovers over a context menu item the background is turned blue and the font is turned white:
.contextMenuItem:hover {background-color: #4281F4;color:white; }
The main context menu is hidden from view (visibility:hidden; display:none;) until the user right-clicks on top of one of the images.
.RADcontextMenu {z-index:1000;
                    visibility:hidden;
                    display:none;
                    width:200px;
                    height:100px;
                    position:absolute;
                    font-family:'Microsoft Sans Serif';
                    font-size:11px;
    }
User Right-Clicks Image Thumbnail
When the user right-clicks on one of the images then the context menu appears and here is the code that handles that:
function drawContextMenu()
{
  isContextMenuDisplayed = true;
  console.log('drawContextMenu : ' + new Date())
  //console.log($('.EScontextMenu').text());
  document.querySelector('.RADcontextMenu').style.visibility = "visible";
  document.querySelector('.RADcontextMenu').style.display = "block";
  document.querySelector('.RADcontextMenu').style.top = mousePos.y + "px";
  document.querySelector('.RADcontextMenu').style.left = mousePos.x + "px";
}
We set the styles so that the context menu will be visible and displayed (block).
We also make sure the top left of the context menu is at the same location (mousePos.x, mousePos.y) where the user right-clicks.
We are able to use mousePos.x & mousePos.y because all while the user is moving the mouse over the page we are tracking the movement with the following JavaScript function.
function onMouseMove(e)
{
  mousePos = { x: e.clientX, y: e.clientY };
}
User Clicks ContextMenu Item
Once the user clicks an item in the context menu we are able to know which one is clicked by it's ID which we use in a case statement.
Here's the code of the two important context menu items that we are working with. Note: This is not the full source of onContextMenuClick(e)
function onContextMenuClick(e)
{
  console.log("onContextMenuClick()");
  hideContextMenu();

  console.log(e.id);
  switch (e.id)
  {
    case 'delete_item':
      {
        // load all localStorage images into array.
        let allImg = JSON.parse(localStorage.getItem("allImg"));
        // remove targeted item
        allImg.splice(currentHoverImageIdx,1);
        // store updated array to localStorage
        localStorage.setItem("allImg",JSON.stringify(allImg));
        removeMainDiv();
        displayImages();
        break;
      }
    case 'copy_address':
      {
        // ### --- Because of limitations on copying to clipboard
        // ###     we have to copy from text input.
        // ####    Since we don't want that
        let clipboard = document.querySelector("#clipboard");
        clipboard.style.visibility = "visible";
        clipboard.style.display = "block";
        clipboard.value=currentImageAddress;
        clipboard.select();
        clipboard.setSelectionRange(0,1000);
        document.execCommand("copy");
        clipboard.style.visibility = "hidden";
        clipboard.style.display = "none";

        break;
      }
Deleting An Item
Now, if the user chooses to delete an item we simply :
- load all images (URLs) from localStorage into a local array
- call the JavaScript splice() method on the array to remove the current item by index.
- save all the items (minus the one we just deleted) back to localStorage.
- remove the main div (clear the screen)
- displayImages() - display all images which are in localStorage.
Copying the Image URL
We also want to make it easy for the user to get the image URL.
I wanted to copy the image URL to the user's clipboard. Copying from the clipboard in a web app has been a strange and arduous task due to odd Browser functionality. Somewhere, some developers seem to think that copying to the clipboard is a dangerous activity. I'm not sure why. I could see that copying from the clipboard might be dangerous but not the other way.
Copying to Clipboard Workaround
In this case to make this work cross-browser / cross-platform I have found a workaround.
I have a hidden input text box that I've named clipboard.
I set the text value of that text box to the value of the image URL.
Next, I select all of the text that is in the text box: clipboard.setSelectionRange(0,1000);
There is a special command of the document called execCommand() that takes different argument values depending on what you want to do. It allows us to copy to the user's clipboard data and it copies the last thing selected so we call that method now: document.execCommand("copy");
Immediately after we do that, we hide the clipboard input text box again and the user never sees it happen.
Now the image URL is copied to the clipboard and the user can paste it anywhere.
RFC: Have a Better Way of Copying to User's Clipboard?
Request For Comments - Please let me know if you know of a better way to copy to the clipboard.
I've researched this fairly extensively and there are numerous offerings but not much that works everywhere.
Summary
It takes a lot of work to do things that were automatic back in the days of WinForm development.
Now we have to style out own controls and work out the event handling ourselves, even though in Visual Studio on WinForm dev it had become quite easy.
All of this was just to get to a good UX (User Experience) aka : intuitive interface.
Looking Forward & Data Sharing
However, none of this goes toward making our data more easily accessible.
The Data Storage Web API
In the next article I will share I will show you how we can easily build a C# .NET Core Web API which will allow us to provide a way to :
- store the user's data remotely.
- retrieve the user's data
- (begins to explain) how to encrypt the user's data using AES256 algorithm (via JavaScript)
This Data Storage Web API will open up a lot of things for us as web developers and you'll have stepped through the challenges that surround creating such a solution.
History
2022-01-07: Original publication of this article.


